Now not everybody out there has the time (or will) to get into the features available, so today we're going to go through one of the key tools in GA: Goals.
Goals are basically essential metrics that you want to monitor for your website. The goals in GA are fully customisable and can give you great insights into users behaviour, but today we'll only cover the set up of basic goals to get you started.
Step 1 - Identify your objectives
This may sound obvious, but if you don't know what your objectives are, you won't be able to define goals for your website. Identify key metrics or action points on your site as this will help you set up your goals. They'll very often be based on business objectives and could include sales, newsletter sign ups, lead sources( quote request, contact forms).
For the purpose of this tutorial we're going to use a 5 step sales funnel where the start will be a product page and the end a completed transaction.
So if your website has unique URLs for each page, then the purchase funnel would be like this:
- www.domain.com/products/example (product page)
- www.domain.com/shopping-cart (product added to cart)
- www.domain.com/shipping (shipping details page)
- www.domain.com/payment (payment details page)
- www.domain.com/order-confirmation (payment/order confirmation page)
Step 2 - Google Analytics setup
Assuming you already have a Google Analytics account for your website, here's how to proceed:
- Log in to your account
- On the "Account Home" page, select the website profile you want to use
- You should now be in the "Standard Reporting" view. On the far right of the main navigation bar, click the "Admin" tab (next to "help")
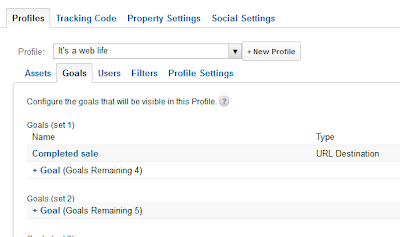
- Select the "Goals" tab and click on + Goal under Goals (set 1)
- Type in your goal name - "Completed sale" for this example
- Make sure "Active" is selected
- Select a goal type - for our example, URL destination is the correct type as we have a specific URL for order confirmation, but select the one appropriate for your objectives. As soon as you select the type, the menu will expand as shown below
- Goal details:
- The goal URL is the completion point, the URL of the final step in the process (here /order-confirmation). Each time this page is loaded, GA will consider that the goal has been completed and attribute a conversion in the reports.
- There are 3 match types in GA, but if you have unique/fixed URLs for each page of the site, then "Exact match" should be selected. "Head match" should be used if variable elements (sessions IDs for example) are added to the goal URL automatically. More on match types >
- If you know how much each sales is worth to your business, then add a goal value as it will help you measure ROI going forward.
- Basic setup complete - If you save your goal at this point then you will be able to track each completed sale/action on your website from this point on. Remember that GA does not work retroactively, so data collected prior to this set up will not include goal data. You can repeat the process above for all your basic goals by adding extra goals in the initial Goal tab.
- Goal funnel - if you want to go further into your analysis and understand what happens at each step of your sales/goals process, then tick the funnel option. This will allow you to enter each individual step of your chosen process in order to track drop offs and other data.
- Enter each URL of the funnel, in the example below I've used the 4 steps before the goal is completed but you can create as many steps as you want. The "Name" field is the description of the step that will apear in your reports.
If Step 1 is required for the goal to be completed, then tick the required box (if the page in step 1 is not loaded, then the goal will not be counted)
- Save your goal and you're now ready to track not only goal completions but also users' behaviour within the sales funnel
- Your new goal will now appear under Admin > Goals for your GA profile
- GA offers 4 sets of 5 goals each which should be more than enough for most users
Step 3 - Generate goal reports in your profile
Now that you've set up your goals, you can start easily generating reports within the main account interface by expanding the Conversions > Goals menu on the left hand side of your screen.
The Funnel visualization report will only be available if you've created goals with funnels.
Happy reporting!


No comments:
Post a Comment